Roofing Project Calculations: Essential Formulas
Importance of Accurate Roofing Calculations
Accurate roofing calculations are the foundation of a successful roofing project. Whether you're working on a small repair or a full roof replacement, knowing the exact measurements and materials required helps you stay on schedule, within budget, and free of unexpected complications. Roofing materials can be expensive, and over-ordering wastes money, while under-ordering can delay your project and cause frustration. In addition, accurate calculations are important for ensuring the roof’s structural integrity and durability, especially in areas prone to harsh weather conditions.
Precise measurements also help you communicate clearly with contractors or suppliers. When you can confidently explain how much material you need and why, you're more likely to avoid misunderstandings, pricing errors, or delays in delivery. Furthermore, homeowners who understand the basic calculations involved in a roofing project are in a better position to evaluate quotes, compare options, and spot potential overcharges.
Ultimately, accuracy in roofing calculations translates to savings in time, money, and effort. It also improves safety by ensuring that the right materials are used in the correct quantities, reducing the risk of structural problems down the line.
Common Mistakes to Avoid
-
Underestimating Roof Area:
Many homeowners make the mistake of measuring only the flat surface of the roof, forgetting to account for the pitch or slope. This leads to purchasing less material than required, causing work stoppages while waiting for additional supplies.
-
Skipping the Waste Factor:
Cutting, overlapping, and mistakes during installation generate material waste. A common oversight is not including an additional 10–15% in your calculations for this purpose. Without this cushion, you may run out of shingles or underlayment halfway through the project.
-
Incorrect Roof Pitch Calculations:
Roof pitch affects how much surface area your roofing materials must cover. Using the wrong pitch multiplier or ignoring the slope altogether can throw off your entire estimate, leaving you short on supplies or overspending unnecessarily.
-
Forgetting Roofing Accessories:
Roofing projects require more than just shingles. Accessories like ridge caps, starter shingles, flashing, drip edges, ventilation units, and nails are essential for proper installation. Failing to include these in your calculation can delay the project and add unplanned costs.
-
Not Accounting for Labor Costs:
Material estimates are only part of the picture. Labor costs vary depending on the roof type, steepness, and region. Assuming a flat rate without checking local labor rates can lead to major underestimation of your total project cost.
-
Neglecting to Double-Check Measurements:
Taking one set of measurements and assuming they are perfect can be risky. Always double-check your dimensions and calculations to catch errors before they turn into costly mistakes during the project.
-
Ignoring Local Building Codes:
Every area has its own building codes and requirements. Failing to consider these when estimating materials and planning your project can lead to code violations, fines, or having to redo parts of the roof.
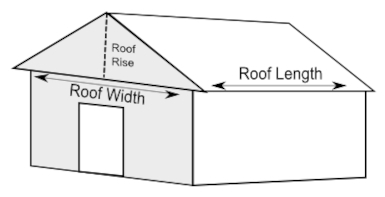
Measuring Your Roof Area
Before you can estimate materials or costs, you need to know the size of your roof. Measuring your roof area accurately is the first and most important step in any roofing project. The total roof area tells you how much material you'll need, how long the job might take, and how much it will likely cost. Even small errors in measurement can lead to buying too much or too little material, which affects your budget and timeline.
How to Measure Roof Dimensions
To get started, you'll need a measuring tape, a calculator, and if possible, a safe way to access the roof. If it's unsafe to walk on the roof, you can take measurements from the ground or use drone or satellite tools. Here's a simple step-by-step method for basic roofs:
- Measure the length and width of each section of the roof. If your roof is rectangular, it’s as simple as multiplying the length by the width.
- For more complex roofs with multiple sections, measure each section individually and add them together.
- Be sure to measure from edge to edge, and include overhangs (also called eaves) in your measurements.
It’s important to take accurate notes and draw a simple sketch of your roof layout as you go. Label each section with the dimensions you recorded to make calculations easier later.
Calculating Total Roof Area (Square Footage Formula)
Once you have your measurements, calculating the total roof area is straightforward. Use the following formula for each section of the roof, then add all the sections together:
Roof Area = Length × Width × Pitch FactorThe pitch factor adjusts the area based on the slope of your roof. A steeper roof has more surface area than a flat one. Here are some common pitch factors:
- Flat or low slope (3:12 or less): 1.03
- Moderate slope (4:12 to 6:12): 1.12 – 1.20
- Steep slope (7:12 to 9:12): 1.24 – 1.30
Example: If your roof section is 30 feet long and 20 feet wide, and has a moderate slope (pitch factor of 1.15):
Roof Area = 30 × 20 × 1.15 = 690 square feetRepeat this for each section of your roof and then total all the areas. This gives you the total square footage, which you’ll use to estimate the amount of roofing materials needed.
Calculating Roofing Material Needs
Once you’ve measured your roof area, the next step is estimating the quantity of roofing materials you’ll need. This includes shingles, underlayment, and roofing nails. Planning ahead helps avoid last-minute trips to the store and ensures your project runs smoothly from start to finish.
Estimating Shingles Quantity (Bundle and Squares Calculation)
Roofing shingles are typically sold in bundles, and it takes about three bundles to cover one roofing square. A roofing square equals 100 square feet of roof area. To estimate how many bundles of shingles you need, follow these steps:
- Calculate your total roof area in square feet.
- Divide the total square footage by 100 to get the number of squares.
- Multiply the number of squares by 3 to find out how many bundles you need.
- Add 10–15% for waste, especially if your roof has hips, valleys, or unusual shapes.
Example: If your roof is 1,500 square feet:
Roofing Squares = 1,500 ÷ 100 = 15 squares
Shingle Bundles = 15 × 3 = 45 bundles
Add 10% waste: 45 × 1.10 = 49.5 → Round up to 50 bundles
Calculating Underlayment Requirements
Underlayment is the protective layer installed beneath the shingles. It’s typically sold in rolls that cover 400 to 450 square feet each. To estimate how much underlayment you need:
- Use your total roof area in square feet.
- Divide the total area by the coverage per roll (usually 400).
- Add a small buffer (5–10%) for overlaps and cutting waste.
Example: For a 1,500 square foot roof:
Underlayment Rolls = 1,500 ÷ 400 = 3.75
Add 10% waste: 3.75 × 1.10 = 4.125 → Round up to 5 rolls
Determining Amount of Roofing Nails
Roofing nails are used to secure the shingles and underlayment. On average, you’ll need about 320 nails per square (100 square feet) for standard 3-tab shingles. Most boxes of nails contain around 2,000 nails.
- Calculate the number of roofing squares.
- Multiply by 320 to get the total number of nails needed.
- Divide that total by the number of nails per box to know how many boxes to buy.
Example: For a 1,500 square foot roof:
Roofing Squares = 1,500 ÷ 100 = 15
Total Nails = 15 × 320 = 4,800 nails
Boxes Needed = 4,800 ÷ 2,000 = 2.4 → Round up to 3 boxes
Always check the manufacturer’s instructions, as nail quantity can vary based on shingle type, roof pitch, and local building codes.
Calculating Roof Pitch and Slope
Understanding your roof’s pitch and slope is essential for accurate material estimates and proper installation. The pitch affects how much surface area your roof covers, how water drains, and what type of materials are most suitable. Calculating slope also helps determine safety measures for the roofing crew and the appropriate pitch multiplier for surface area calculations.
Understanding Roof Pitch
Roof pitch is a way of describing the steepness or angle of your roof. It’s typically expressed as a ratio, such as 4:12 or 6:12. This means the roof rises 4 or 6 inches for every 12 inches of horizontal run. A higher first number means a steeper roof.
Here are some common roof pitch categories:
- Low pitch: 2:12 to 4:12 – Easier to walk on, may require special materials for waterproofing.
- Medium pitch: 5:12 to 7:12 – Most common residential pitch, easy to calculate and work with.
- Steep pitch: 8:12 and above – Offers better drainage but can be harder and more dangerous to work on.
Knowing your roof pitch allows you to apply the correct pitch multiplier when calculating total surface area. For example, a 6:12 pitch has a multiplier of about 1.12, meaning the sloped surface is 12% greater than the flat footprint.
Simple Formula for Roof Slope Calculation
You can calculate the pitch of your roof using basic measurements and a little math. Here's how to do it safely from the attic or with a level and tape measure:
- Measure 12 inches horizontally along a rafter (the run).
- Measure vertically from that point to the top of the rafter (the rise).
The pitch is then expressed as: Rise:Run
Example: If the rise is 6 inches over a 12-inch run, your roof pitch is 6:12.
To calculate the slope in degrees, you can use this formula:
Roof Slope (degrees) = arctangent (rise ÷ run)Example: A roof with a 6-inch rise and 12-inch run:
Roof Slope = arctan(6 ÷ 12) = arctan(0.5) ≈ 26.57°If you're not comfortable with trigonometry, you can use online calculators or lookup tables to convert pitch ratios into slope degrees or pitch multipliers. These values are especially helpful when estimating roofing materials and working with contractors.
Estimating Waste and Extra Materials
Every roofing project generates some waste due to cuts, overlaps, and installation errors. To avoid delays and last-minute trips to the store, it’s important to factor in a realistic amount of extra material. Including waste in your calculations ensures that you have enough shingles, underlayment, nails, and accessories to complete the job without interruption. Proper planning also helps control costs by preventing overbuying and reducing the risk of running out of supplies mid-project.
Standard Waste Percentage Guidelines
Most roofing professionals recommend adding a certain percentage to your material estimates to account for waste. The exact percentage can vary based on roof complexity, material type, and your level of experience. Here are general waste guidelines:
- Simple roof shapes (gable or shed): Add 5%–10% waste.
- Moderate complexity (hip roofs, dormers): Add 10%–15% waste.
- Complex roofs (multiple valleys, angles, and cuts): Add 15%–20% waste.
Also consider ordering a few extra bundles of shingles for future repairs. Shingle colors and styles may be discontinued, making it difficult to find an exact match later on.
Calculating Material Waste Accurately
To calculate waste, simply multiply your estimated material quantity by your chosen waste percentage. Then add that result to your original estimate to get the final quantity.
Example – Shingles: You calculated that you need 45 bundles of shingles for a simple gable roof. Add 10% for waste:
Waste = 45 × 0.10 = 4.5 bundles
Total Bundles = 45 + 4.5 = 49.5 → Round up to 50 bundles
Example – Underlayment: If your roof area is 1,600 square feet and each roll of underlayment covers 400 square feet:
Rolls Needed = 1,600 ÷ 400 = 4 rolls
Waste = 4 × 0.10 = 0.4 rolls
Total Rolls = 4 + 0.4 = 4.4 → Round up to 5 rolls
Note: Always round up your final result to the nearest whole number. It’s better to have a little extra than not enough. Having spare materials on hand also gives you peace of mind and may save you money in the long run if small repairs are needed later.
Estimating Cost of Roofing Project
One of the most important steps in planning a roofing project is estimating the total cost. Knowing your budget ahead of time helps you make informed decisions, avoid surprises, and prepare for any unexpected expenses. A complete roofing budget includes material costs, labor charges, permit fees, and contingency funds for waste or minor repairs. By breaking down each part of the project, you’ll get a clear picture of what to expect and how much to spend.
Roofing Materials Cost Calculation
Start by calculating the cost of all materials based on the total roof area and the price per unit. Roofing materials typically include shingles (or metal panels, tiles, etc.), underlayment, flashing, nails, ridge caps, drip edges, and ventilation components.
- Find the price per unit: Check current prices for shingles (per bundle), underlayment (per roll), and nails (per box).
- Use your quantity estimates: Multiply the number of bundles, rolls, or boxes needed (including waste) by the price per unit.
- Add accessory costs: Include vents, flashing, and other necessary items based on roof design.
Example:
- 50 bundles of shingles at $30 each = $1,500
- 5 rolls of underlayment at $50 each = $250
- 3 boxes of nails at $25 each = $75
- Accessories (ridge vents, flashing, etc.) = $200
Total Materials Cost = $2,025
Labor Cost Estimation
Labor costs can vary based on location, roof complexity, and the experience level of the crew. Most roofing contractors charge either by the square (100 square feet) or by the hour. On average, labor costs range from $150 to $300 per square, depending on job difficulty and region.
- Calculate the number of squares (roof area ÷ 100).
- Multiply by the average labor cost per square.
- Include any extra labor for roof removal, repairs, or steep pitches.
Example:
Roof Area = 1,500 sq ft → 15 squares
Labor Cost per Square = $200
Total Labor Cost = 15 × $200 = $3,000
Also, ask if the estimate includes removal of the old roof. Tear-off costs can add $1–$5 per square foot.
Tips for Creating a Project Budget
- Get multiple quotes: Always get at least 2–3 estimates from licensed contractors to compare pricing and services.
- Plan for extras: Add 10%–20% to your budget for unforeseen repairs or material price increases.
- Check for permits: Some areas require building permits for roofing projects. Ask your contractor if this is included or if you need to budget separately.
- Ask about warranties: Consider the value of extended warranties or upgraded materials, even if they cost a little more upfront.
- Don’t forget disposal fees: Dumping old roofing material may incur extra charges. Be sure this is covered in your quote.
Creating a detailed roofing budget gives you control and confidence throughout the entire project. It helps you avoid surprises, make smart choices, and stay on track from start to finish.
Time Estimation for Roofing Projects
Knowing how long a roofing project will take is just as important as budgeting. Time estimates help you plan for disruptions, schedule contractors properly, and avoid surprises. Whether you're replacing the entire roof or just doing repairs, understanding the timeline ensures a smoother process and realistic expectations.
Factors Affecting Roofing Project Duration
The time it takes to complete a roofing project can vary widely depending on several key factors:
- Roof Size: Larger roofs naturally take more time to complete. A 1,000 sq ft roof might take a day, while a 3,000+ sq ft roof could take several days.
- Roof Complexity: Simple gable roofs are faster to install than complex roofs with multiple angles, valleys, or dormers.
- Weather Conditions: Rain, strong winds, or extreme heat can delay work or make it unsafe for crews to continue.
- Material Type: Asphalt shingles install faster than tile or metal roofs, which require more precision and handling.
- Crew Size and Experience: A skilled, well-staffed team will finish the job faster than a small or inexperienced crew.
- Tear-Off Time: Removing the old roof can add one or more days to the project, depending on the number of layers and how they’re attached.
- Permits and Inspections: Waiting for city approvals or inspections can cause delays if not planned properly.
Basic Formula for Project Time Estimation
You can use a simple formula to get a rough estimate of how long a roofing project might take:
Estimated Time (in days) = (Total Roof Area in sq ft ÷ Daily Installation Rate per Crew) + Tear-Off Time
The daily installation rate varies depending on material and team size. Here are general averages for asphalt shingles:
- Small crew (2–3 workers): 1,000–1,500 sq ft per day
- Medium crew (4–6 workers): 1,500–2,500 sq ft per day
- Large crew (7+ workers): 2,500–4,000+ sq ft per day
Example: If your roof is 2,000 square feet and your contractor’s team installs about 1,000 sq ft per day, and you add 1 day for tear-off:
Estimated Time = (2,000 ÷ 1,000) + 1 = 2 + 1 = 3 days
Tip: Always ask your contractor for a timeline that includes delivery, prep work, weather buffers, and cleanup. This gives you a complete picture and helps you plan accordingly.
Common Roofing Project Calculation Examples
To help you understand how roofing calculations work in real-life situations, let’s walk through two practical examples: one for a standard shingle roof replacement and another for a metal roofing installation. These examples show how to estimate materials, labor, and time based on common formulas and average values.
Practical Example: Shingle Roof Replacement
Project: Replacing asphalt shingles on a 2,000 square foot gable roof with a moderate slope (6:12 pitch).
Pitch Factor: 1.12 (for a 6:12 roof)
Step 1 – Calculate Total Roof Area:
Total Roof Area = 2,000 × 1.12 = 2,240 sq ft
Step 2 – Calculate Roofing Squares:
Roofing Squares = 2,240 ÷ 100 = 22.4 → Round up to 23 squares
Step 3 – Estimate Shingles Needed:
Bundles Needed = 23 × 3 = 69 bundles
Add 10% waste: 69 × 1.10 = 75.9 → Round up to 76 bundles
Step 4 – Underlayment Rolls:
Underlayment Rolls = 2,240 ÷ 400 = 5.6
Add 10%: 5.6 × 1.10 = 6.16 → Round up to 7 rolls
Step 5 – Nails:
Total Nails = 23 squares × 320 = 7,360 nails
Boxes Needed = 7,360 ÷ 2,000 = 3.68 → Round up to 4 boxes
Step 6 – Time Estimate:
Installation Rate = 1,000 sq ft/day (medium crew)
Tear-off time = 1 day
Time = (2,240 ÷ 1,000) + 1 = 2.24 + 1 ≈ 3.24 → Round up to 4 days
Estimated Materials:
76 bundles of shingles, 7 rolls of underlayment, 4 boxes of nails
Estimated Time: 4 days
Practical Example: Metal Roofing Installation
Project: Installing metal roofing panels on a 1,500 square foot hip roof with a 7:12 pitch
Pitch Factor: 1.25
Step 1 – Calculate Total Roof Area:
Total Roof Area = 1,500 × 1.25 = 1,875 sq ft
Step 2 – Metal Panel Coverage: Each panel covers 36 inches (3 feet) in width. Assume 10-foot-long panels for easy math:
Panel Coverage = 3 ft × 10 ft = 30 sq ft per panel
Panels Needed = 1,875 ÷ 30 = 62.5 → Round up to 65 panels
Add 10% waste: 65 × 1.10 = 71.5 → Round up to 72 panels
Step 3 – Underlayment Rolls:
Rolls = 1,875 ÷ 400 = 4.68
Add 10%: 4.68 × 1.10 = 5.15 → Round up to 6 rolls
Step 4 – Fasteners (screws): Metal roofs use screws instead of nails, with about 80 screws per 100 sq ft:
Screws = (1,875 ÷ 100) × 80 = 1,500 screws
Screws per box = 250 → 1,500 ÷ 250 = 6 boxes
Step 5 – Time Estimate:
Installation Rate = 800 sq ft/day (due to slower panel handling)
Tear-off time = 1 day
Time = (1,875 ÷ 800) + 1 = 2.34 + 1 ≈ 3.34 → Round up to 4 days
Estimated Materials:
72 metal panels, 6 rolls of underlayment, 6 boxes of screws
Estimated Time: 4 days
These examples show how using the right formulas and waste percentages can give you a solid estimate for both materials and project duration. Always adjust your numbers based on the specific shape, slope, and complexity of your roof.
Checklists for Successful Roofing Projects
Using a checklist keeps your project on track, helps you stay organized, and ensures you don’t miss any important steps. Below is a basic roofing project checklist you can customize based on your needs:
✔ Pre-Project Checklist
- ✔ Measure the roof area accurately
- ✔ Determine roof pitch and slope
- ✔ Choose your roofing material type
- ✔ Calculate material quantities (shingles, underlayment, nails/screws, accessories)
- ✔ Get multiple contractor quotes
- ✔ Apply for permits if required
✔ Material & Budget Planning
- ✔ Estimate total material cost
- ✔ Estimate labor cost (including tear-off if needed)
- ✔ Add 10–20% contingency to your budget
- ✔ Order all materials in advance (include waste buffer)
✔ Installation & Completion
- ✔ Prepare the site (protect landscaping and structures)
- ✔ Remove old roofing (if applicable)
- ✔ Inspect and repair roof deck if needed
- ✔ Install underlayment, flashing, and shingles or panels
- ✔ Inspect finished roof for leaks or gaps
- ✔ Clean up debris and properly dispose of old materials
Frequently Asked Questions (FAQs)
1. How do I know how many shingles I need?
Start by measuring your total roof area in square feet, then divide by 100 to get the number of roofing squares. Multiply that by 3 to estimate the number of bundles, and don’t forget to add 10–15% for waste.
2. What is a roofing square?
One roofing square equals 100 square feet of roof area. It’s a common measurement used in the roofing industry to simplify material estimates.
3. How do I find the pitch of my roof?
Measure 12 inches horizontally along the roof (run), then measure the vertical rise at that point. The pitch is expressed as a ratio of rise to run (e.g., 6:12). You can also use a pitch calculator for faster results.
4. Can I use a roofing calculator instead of doing manual calculations?
Yes! Roofing calculators are designed to simplify the process. You can use them to estimate area, pitch, material quantities, and even costs. Just make sure to double-check the inputs for accuracy.
5. How much waste should I include in my material estimate?
For simple roofs, add about 10% for waste. For complex roofs with lots of angles and valleys, you may need to add 15–20% to cover trimming and fitting pieces.
6. How long does a typical roofing project take?
Most residential roofing jobs take 1–5 days, depending on roof size, complexity, weather conditions, and crew size. Tear-off, repairs, and inspections can add extra time.
7. Should I remove the old roof before installing a new one?
It’s usually best to remove old shingles to inspect the decking underneath and ensure proper installation. Some codes allow for one additional layer, but it depends on the roof condition and local regulations.
8. What tools do I need for a roofing project?
Basic tools include a measuring tape, roofing nails or screws, a hammer or nail gun, chalk line, utility knife, ladder, and safety gear. Professionals may use additional tools like roofing shovels, harnesses, or cutting tools.
9. How much does a roofing project typically cost?
The cost varies based on material, roof size, and labor. On average, asphalt shingle roofs cost $3 to $6 per square foot installed, while metal or tile roofing can cost significantly more.
10. Do I need a permit for my roofing project?
In many areas, yes. Always check with your local building department to see if a permit is required before starting a roofing project. Permits help ensure the work meets safety and building code standards.
References
- The Complete Guide to Roofing & Siding – Roger Walker – 2010 – Creative Homeowner
- The Book of Home How-To – Black & Decker – 2017 – Cool Springs Press
- Roofing Construction & Estimating – Daniel Atcheson – 2005 – Craftsman Book Company
- Residential Construction Academy: House Wiring – Gregory W. Fletcher – 2008 – Cengage Learning
- Graphic Guide to Frame Construction – Rob Thallon – 2008 – Taunton Press
- Calculating Construction Equipment Utilization
- The Mathematics of Construction Materials Testing
- Calculating HVAC Requirements for Construction Projects
- The Future of Construction: AI-driven Calculations and Estimation
- Mastering Construction Measurement: Tools and Techniques
- Calculating Earthwork Volumes in Construction Projects
- The Role of Construction Calculations in Risk Management
- Estimating Concrete Quantities for Construction: Best Approaches
- Construction Calculations: Meeting Building Codes and Standards
- Financial Planning for Construction Projects: Advanced Calculations
- Calculating Strength of Construction Materials | Construction Insights
- Construction Cost Index: Significance, Calculation, and Trends
- Enhancing Construction Accuracy with BIM: Precise Calculations
- Construction Time & Cost Calculations: Techniques & Formulas
- Roofing Project Calculations: Essential Formulas
- Green Building Construction Calculations: Formulas for Sustainability
- The Mathematics of Reinforced Concrete Design in Construction
- Streamlining Construction Quantity Surveying: Tips for Efficient Cost Control
- Avoiding Costly Mistakes in Construction Calculations: A Comprehensive Guide
- Calculating Construction Labor Costs: Tips for Project Managers
- Efficiently Handling Construction Takeoffs: Best Practices
- The Importance of Accurate Construction Area Calculations | Key Factors & Benefits
- Construction Measurement Units Demystified: Metric vs. Imperial
- Top Construction Calculation & Estimation Software - Boost Efficiency!
- The Ultimate Guide to Construction Calculations: A Comprehensive Overview
- Optimizing Construction Project Budgets: A Data-Driven Approach
- Simplified Construction Estimation: Tips for Accurate Calculations
- Mastering Construction Math: 15 Fundamental Calculations Explained
- How to Calculate Material Quantities for Construction Projects
- Construction Cost Calculations: A Comprehensive Step-by-Step Guide