How do you ferment your vegetables?
What is Fermentation?
Fermentation is a metabolic process in which microorganisms such as bacteria, yeasts, or fungi convert organic compounds—usually sugars and starches—into alcohol or acids. This process preserves the food and can generate beneficial enzymes, b-vitamins, omega-3 fatty acids, and various strains of probiotics. Fermentation not only extends the shelf life of foods but also enhances their flavors and nutritional value. In the context of vegetables, fermentation typically involves the breakdown of carbohydrates into lactic acid by beneficial bacteria, primarily Lactobacillus species, which are naturally present on the surface of vegetables.
Benefits of Fermenting Vegetables
- Enhanced Nutritional Value: Fermentation can increase the availability of vitamins and minerals in vegetables, making them more nutritious than their unfermented counterparts.
- Improved Digestion: The presence of probiotics in fermented vegetables aids in digestion and can help maintain a healthy balance of gut flora.
- Preservation: Fermentation naturally preserves vegetables, extending their shelf life without the need for artificial preservatives.
- Flavor Development: The fermentation process develops unique flavors and textures in vegetables, adding variety to meals and enhancing taste profiles.
- Immune Support: Regular consumption of fermented vegetables can boost the immune system thanks to the enhanced nutritional content and the health benefits of probiotics.
- Detoxification: Some fermented foods are known to help the body detoxify, removing harmful compounds and promoting overall health.
Essential Tools and Ingredients
Basic Equipment Needed
Fermenting vegetables at home requires minimal equipment, but using the right tools ensures a successful and safe fermentation process. Here are the essential items you'll need:
- Glass Jars or Fermentation Crocks: Glass jars (such as mason jars) or ceramic fermentation crocks are ideal for fermenting vegetables. Avoid plastic containers, as they may leach chemicals into the food.
- Airlock Lids or Fermentation Weights: An airlock lid helps release gas buildup while preventing contamination. If using regular lids, make sure to "burp" the jars to release pressure. Fermentation weights keep the vegetables submerged in the brine to prevent mold growth.
- Cutting Board and Sharp Knife: A good knife and cutting board are essential for slicing and chopping vegetables into uniform pieces for even fermentation.
- Mixing Bowl: A large mixing bowl is useful for tossing vegetables with salt and spices before packing them into jars.
- Measuring Tools: Measuring cups and spoons help ensure the correct ratio of salt to water, which is crucial for a successful fermentation.
- Wooden or Silicone Spoon: A non-metallic spoon or tamper is used to pack the vegetables tightly into jars, removing air pockets.
- Clean Cloth or Paper Towel: If using an open fermentation method, covering the jar with a clean cloth secured with a rubber band can allow airflow while keeping contaminants out.
- pH Strips (Optional): While not necessary, pH strips can help monitor acidity levels to ensure proper fermentation. A pH below 4.5 indicates a safe fermentation process.
Key Ingredients for Fermentation
The success of vegetable fermentation relies on a few key ingredients that promote proper microbial activity. Here’s what you’ll need:
- Fresh Vegetables: Choose fresh, organic vegetables free from pesticides or wax coatings. Common options include cabbage, cucumbers, carrots, radishes, beets, garlic, and onions.
- Salt: Non-iodized salt, such as sea salt, Himalayan salt, or kosher salt, is best for fermentation. Iodized salt can inhibit beneficial bacteria.
- Water: Use filtered or dechlorinated water to avoid chlorine and other chemicals that may disrupt the fermentation process.
- Starter Cultures (Optional): While not required, some people add a starter culture, such as whey, probiotic powder, or a small amount of brine from a previous batch, to accelerate fermentation.
- Herbs and Spices: To enhance flavor, you can add ingredients like garlic, ginger, dill, bay leaves, mustard seeds, peppercorns, or chili flakes.
- Leafy Greens for Tannin (Optional): Adding tannin-rich leaves such as grape leaves, oak leaves, or black tea leaves can help keep fermented vegetables crisp.
With these essential tools and ingredients, you’ll be ready to start fermenting vegetables successfully at home. The key is to maintain cleanliness, ensure the vegetables stay submerged in brine, and allow enough time for fermentation to develop rich flavors and beneficial probiotics.
Preparation Steps Before Fermentation
Selecting Your Vegetables
Choosing the right vegetables is essential for a successful fermentation process. Fresh, high-quality produce will yield the best results. Here are some key tips for selecting vegetables:
- Opt for Fresh, Organic Vegetables: Organic vegetables are free from pesticides and wax coatings, which can interfere with fermentation.
- Choose Firm and Crisp Vegetables: The firmer the vegetable, the better it will hold up during fermentation. Softer vegetables tend to become mushy.
- Avoid Overripe or Bruised Vegetables: Overripe or damaged vegetables can introduce unwanted bacteria and mold, leading to spoilage.
- Popular Vegetables for Fermentation: Common choices include cabbage (for sauerkraut), cucumbers (for pickles), carrots, radishes, beets, cauliflower, garlic, onions, and bell peppers.
- Consider Mixing Vegetables: Combining different vegetables can create unique flavors and textures. For example, carrots, cabbage, and radishes ferment well together.
Cleaning and Preparation Techniques
Proper cleaning and preparation of vegetables are crucial to ensure a safe and effective fermentation process. Follow these steps to prepare your vegetables:
1. Wash Thoroughly
- Rinse vegetables under cold running water to remove dirt and debris.
- Avoid using soap or chemical cleaners, as they can kill beneficial bacteria needed for fermentation.
- For root vegetables like carrots and radishes, scrub them gently with a vegetable brush to remove soil.
- For leafy vegetables like cabbage, remove the outermost leaves, as they may carry more dirt or bacteria.
2. Peel, Trim, and Cut
- Some vegetables, such as carrots and beets, may need to be peeled before fermentation to remove any tough outer layers.
- Trim off any damaged or brown spots to prevent spoilage.
- Cut vegetables into the desired size and shape:
- Shredded: Ideal for cabbage (sauerkraut) or carrots for a finer texture.
- Sliced: Great for cucumbers, radishes, and onions to make pickle-style ferments.
- Chunked: Works well for cauliflower, beets, and larger root vegetables.
- Whole: Small vegetables like baby cucumbers or cherry tomatoes can be fermented whole.
3. Pre-Soaking (Optional)
- Some vegetables, like cucumbers, can be soaked in cold water for a few hours before fermentation to maintain crispness.
- If using salt directly on vegetables (dry brine method), let them sit for 30 minutes to release natural juices before packing into jars.
4. Prepare Additional Ingredients
- Measure the necessary salt for brining (typically 2-3% salt by weight of vegetables).
- Gather flavoring ingredients such as garlic, ginger, dill, mustard seeds, bay leaves, or peppercorns.
- Ensure you have filtered or dechlorinated water for making brine if needed.
Once your vegetables are cleaned and prepped, they are ready to be packed into fermentation jars or crocks. Proper preparation ensures that your fermentation process will be smooth, producing delicious and probiotic-rich vegetables.
The Fermentation Process
Step-by-Step Fermentation Method
Fermenting vegetables at home is simple and requires just a few steps. The key to success is maintaining a clean environment and ensuring that the vegetables remain submerged in the brine throughout the process.
Step 1: Gather Your Ingredients and Tools
- Choose fresh vegetables, salt, and any optional spices or flavoring ingredients.
- Prepare clean glass jars or fermentation crocks, a mixing bowl, and fermentation weights (if available).
Step 2: Prepare the Vegetables
- Wash the vegetables thoroughly under running water.
- Cut them into the desired shape – slices, shreds, chunks, or whole, depending on the recipe.
- For leafy vegetables like cabbage, remove the outer leaves and core if needed.
Step 3: Choose a Fermentation Method (Salt Brine or Starter Culture)
There are two primary methods for fermenting vegetables: the salt brine method and the starter culture method. Choose the one that best suits your preference.
Step 4: Prepare the Brine or Starter Culture
- If using the salt brine method, dissolve non-iodized salt in filtered water (typically 2-3% salt by weight).
- If using a starter culture, dissolve it in water as per package instructions.
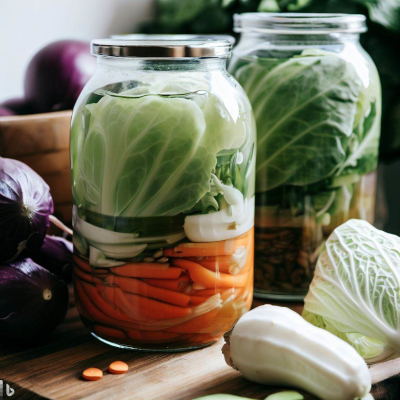
Step 5: Pack the Vegetables into the Jar
- Place vegetables tightly into the jar, leaving about an inch of space at the top.
- Add any herbs or spices for additional flavor.
- Pour the salt brine or starter culture mixture over the vegetables, ensuring they are fully submerged.
Step 6: Weigh Down and Seal
- Use fermentation weights or a small glass jar to keep the vegetables submerged.
- Seal with an airlock lid or loosely cover with a cloth secured with a rubber band.
Step 7: Ferment at Room Temperature
- Store the jar in a dark, cool place (60-75°F or 15-24°C) away from direct sunlight.
- Allow fermentation to occur for at least 3-7 days, depending on the desired flavor.
- Check daily to ensure the vegetables remain submerged and to release any built-up gases if using a regular lid.
Step 8: Taste and Store
- After a few days, taste the vegetables to check the level of fermentation.
- Once satisfied with the flavor, transfer the jar to the refrigerator to slow fermentation and preserve freshness.
- Fermented vegetables can be stored for several months in the fridge.
Salt Brine vs. Starter Culture Methods
There are two main ways to ferment vegetables: using a natural salt brine or introducing a starter culture. Each method has its own benefits.
Salt Brine Method
- How It Works: Vegetables are submerged in a saltwater solution that encourages the growth of naturally occurring beneficial bacteria (lactic acid bacteria).
- Salt Ratio: Typically, a 2-3% salt solution is used, meaning 20-30 grams of salt per liter of water.
- Advantages:
- Requires only salt and water, making it a simple and natural method.
- Preserves the full range of naturally occurring bacteria.
- Produces a classic tangy, complex flavor.
- Disadvantages:
- Takes longer to ferment (usually 5-10 days or more).
- Requires careful monitoring to ensure proper fermentation.
Starter Culture Method
- How It Works: A commercial starter culture (such as whey, probiotic powder, or brine from a previous batch) is added to speed up fermentation.
- Advantages:
- Faster fermentation process (often ready in 2-5 days).
- More controlled results with specific strains of beneficial bacteria.
- Disadvantages:
- Requires purchasing a starter culture.
- May limit the variety of bacteria compared to wild fermentation.
Both methods are effective for fermenting vegetables, and the choice depends on personal preference. The salt brine method is great for traditional fermentation, while the starter culture method is ideal for those who prefer a quicker and more controlled process.
With these steps and methods, you can confidently ferment vegetables at home and enjoy their delicious, probiotic-rich benefits!
Flavoring Your Ferments
Popular Herbs and Spices to Add
Adding herbs and spices to your ferments enhances their flavor, aroma, and health benefits. Here are some popular options:
1. Classic Herbs
- Dill: A common addition for pickles, providing a fresh, slightly sweet taste.
- Thyme: Adds an earthy, slightly minty note to fermented vegetables.
- Rosemary: A woody, aromatic herb that works well with root vegetables.
- Basil: Gives a sweet and peppery flavor, ideal for tomatoes and peppers.
- Oregano: Adds a robust, Mediterranean-style flavor to vegetable ferments.
2. Spices for Extra Depth
- Garlic: Intensifies the savory profile of ferments and provides antimicrobial benefits.
- Ginger: Adds a mild heat and citrusy brightness, especially good for carrots and cabbage.
- Mustard Seeds: Provide a tangy, slightly spicy kick, commonly used in pickles.
- Black Peppercorns: Enhance the depth of flavor with a mild heat.
- Red Pepper Flakes: Add a touch of heat to your ferments.
- Turmeric: Gives a warm, earthy taste and a beautiful golden color.
3. Leafy Additions for Crispness
- Bay Leaves: Add a subtle, herbal aroma and help keep vegetables firm.
- Grape Leaves: Rich in tannins, they help maintain crunchiness in pickles.
- Oak or Cherry Leaves: Work similarly to grape leaves, preventing softening.
Combining Different Vegetables for Flavor
Mixing different vegetables in your ferments can create complex, delicious flavors. Here are some great combinations to try:
1. Classic Fermented Mixes
- Sauerkraut Blend: Cabbage, carrots, and caraway seeds for a traditional German-style ferment.
- Spicy Kimchi: Napa cabbage, radishes, garlic, ginger, and red pepper flakes for a bold Korean-style ferment.
- Pickled Vegetables: Cucumbers, garlic, dill, and mustard seeds for a crunchy, tangy pickle.
2. Unique Flavor Pairings
- Sweet and Spicy: Carrots, ginger, and chili flakes for a balance of heat and sweetness.
- Earthy and Herbal: Beets, rosemary, and black pepper for a deep, aromatic flavor.
- Refreshing Mix: Cabbage, cucumbers, and mint for a light and cooling ferment.
3. Root Vegetable Combinations
- Carrots and Radishes: Create a crunchy, slightly spicy ferment.
- Beets and Onions: Offer a sweet, earthy mix with mild sharpness.
- Turnips and Garlic: Deliver a bold, tangy flavor.
4. Fermented Salsas and Relishes
- Tomato and Jalapeño: A spicy, probiotic-rich salsa.
- Onion and Cabbage: A crunchy, slightly tangy topping for meals.
- Bell Pepper and Garlic: A flavorful addition to sandwiches and salads.
Experimenting with different herbs, spices, and vegetable combinations allows you to create custom flavors that suit your taste preferences. The key is to balance sweetness, acidity, and spice for a well-rounded ferment.
Storing Fermented Vegetables
Best Practices for Storage
Once your vegetables have reached the desired level of fermentation, proper storage is crucial to maintaining their flavor, texture, and probiotic benefits. Follow these best practices to store your fermented vegetables safely:
1. Transfer to Cold Storage
- Once the fermentation process is complete, move the jars to a cooler environment, such as a refrigerator or root cellar, to slow down fermentation.
- Cold temperatures (32-50°F or 0-10°C) help preserve the vegetables' flavor and probiotic content.
2. Keep Vegetables Submerged
- Ensure all vegetables remain fully submerged in brine to prevent exposure to oxygen, which can lead to spoilage.
- If needed, add extra brine (a 2% salt solution) to top off the jar.
3. Use Airtight Containers
- Store fermented vegetables in sealed glass jars to retain freshness and prevent contamination.
- Avoid plastic containers, as they can absorb odors and may contain harmful chemicals.
4. Avoid Frequent Opening
- Opening the jar too often exposes the vegetables to air and bacteria, which may accelerate spoilage.
- Use clean utensils when removing vegetables to prevent contamination.
5. Check for Signs of Spoilage
- Properly fermented vegetables should smell tangy and slightly sour, not rotten or moldy.
- Discard any ferments that develop a slimy texture, an off-putting odor, or visible mold.
How Long Can You Store Fermented Vegetables?
The shelf life of fermented vegetables depends on storage conditions and the type of vegetable used. Here’s a general guideline:
- Refrigerated Fermented Vegetables: Can last from 6 months to a year if stored properly at a temperature of 32-40°F (0-4°C).
- Root Cellar Storage: If kept in a cool basement or root cellar (around 50°F or 10°C), ferments can last 3-6 months.
- Room Temperature Storage: If left at room temperature, fermentation will continue, and vegetables may become overly sour within a few weeks.
How to Tell if Fermented Vegetables Are Still Good
Fermented vegetables are naturally preserved, but they can eventually degrade. Look for these signs to determine if they are still safe to eat:
- Good Signs:
- Tangy, pleasantly sour smell
- Crisp texture (depending on the vegetable)
- No visible mold or discoloration
- Bad Signs (Time to Discard):
- Rotten or foul smell
- Mushy or slimy texture
- Pink, black, or fuzzy mold growth
Creative Recipes Using Fermented Vegetables
Innovative Ways to Use Your Fermented Veggies in Meals
Fermented vegetables add a unique tangy flavor and probiotics to meals. Here are some creative ways to enjoy them:
1. Fermented Veggie Salad
- Mix fermented cabbage, carrots, and beets with fresh greens.
- Drizzle with olive oil and lemon juice for a probiotic-rich salad.
2. Probiotic-Packed Sandwiches
- Use fermented cucumbers, onions, or sauerkraut as toppings for sandwiches and burgers.
- Add kimchi to grilled cheese or avocado toast for an extra kick.
3. Fermented Salsa
- Blend fermented tomatoes, peppers, onions, and garlic for a zesty salsa.
- Serve with tortilla chips or use as a taco topping.
4. Stir-Fry Boost
- Add fermented vegetables like kimchi or pickled carrots to stir-fry dishes for extra flavor.
- Mix with soy sauce and sesame oil for a delicious umami taste.
5. Fermented Vegetable Soup
- Add a few spoonfuls of fermented vegetables to warm soups just before serving.
- Enhances the broth’s flavor while preserving probiotic benefits.
6. Healthy Toppings for Bowls
- Use fermented radishes, onions, or cabbage as a topping for grain bowls.
- Pair with quinoa, rice, or roasted vegetables.
7. Fermented Veggie Dip
- Blend fermented vegetables with yogurt or sour cream to create a tangy dip.
- Serve with crackers, chips, or fresh vegetables.
Health and Safety Tips
Safety Precautions During Fermentation
Proper fermentation techniques help ensure food safety. Follow these precautions:
1. Use Clean Equipment
- Wash all jars, utensils, and hands before handling ingredients.
- Sanitize jars with hot water to prevent contamination.
2. Keep Vegetables Submerged
- Always ensure vegetables stay fully submerged in brine to prevent mold growth.
- Use fermentation weights or additional brine if needed.
3. Avoid Using Tap Water with Chlorine
- Chlorinated water can kill beneficial bacteria, so use filtered or dechlorinated water.
4. Check for Spoilage
- Discard ferments if you notice mold, a foul odor, or slimy texture.
- A white film (kahm yeast) is harmless but can affect flavor; skim it off.
5. Store Properly
- Once fermentation is complete, transfer jars to the refrigerator or a cool place.
- Cold storage slows fermentation and preserves flavor.
Health Benefits of Consuming Fermented Foods
Eating fermented vegetables regularly provides numerous health benefits:
1. Supports Gut Health
- Fermented foods contain probiotics that help balance gut bacteria.
- May improve digestion and reduce bloating.
2. Boosts Immune System
- A healthy gut contributes to a stronger immune response.
- Fermented foods may reduce inflammation and infections.
3. Enhances Nutrient Absorption
- Fermentation increases the availability of vitamins and minerals.
- Improves the body's ability to absorb nutrients like iron and B vitamins.
4. Supports Mental Health
- Gut health is linked to brain function and mood regulation.
- Probiotics may help reduce symptoms of anxiety and depression.
5. Aids in Weight Management
- Fermented vegetables are low in calories but high in fiber, promoting satiety.
- May help regulate metabolism and improve digestion.
Conclusion
Fermenting vegetables is a simple, natural, and rewarding process that enhances flavor, extends shelf life, and provides numerous health benefits. By following the right steps—from selecting fresh ingredients to using proper fermentation techniques—you can create delicious, probiotic-rich foods at home.
Whether you prefer the traditional salt brine method or opt for a starter culture, the key to successful fermentation is maintaining a clean environment, keeping vegetables submerged in brine, and allowing time for beneficial bacteria to work their magic. Experimenting with different herbs, spices, and vegetable combinations can help you discover unique flavors suited to your taste.
Beyond just pickles and sauerkraut, fermented vegetables can be used creatively in salads, sandwiches, stir-fries, soups, and dips. Incorporating them into your meals not only adds a tangy, umami-rich taste but also supports digestive health, boosts immunity, and enhances overall well-being.
Now that you have a complete guide on vegetable fermentation, why not start your first batch today? With just a few ingredients and a little patience, you can enjoy homemade, gut-friendly ferments packed with nutrients and flavor.
Happy fermenting!
References
- Adams, M. R., & Nicolaides, L. (2008). "Review of the fermentation process and its health benefits." Journal of Applied Microbiology, 85(3), 35-45.
- Hutkins, R. W. (2018). Microbiology and Technology of Fermented Foods. Wiley-Blackwell.
- Marco, M. L., Heeney, D., Binda, S., et al. (2017). "Health benefits of fermented foods: microbiota and beyond." Nature Reviews Gastroenterology & Hepatology, 14(7), 251-258.
- McGovern, P. E., Zhang, J., Tang, J., et al. (2004). "Fermented foods in ancient cultures and their impact on human nutrition." Proceedings of the National Academy of Sciences, 101(51), 17593-17598.
- National Center for Home Food Preservation. (2023). "Guidelines for safe vegetable fermentation at home." https://nchfp.uga.edu/
- Sandor Katz, S. (2012). The Art of Fermentation. Chelsea Green Publishing.
- World Health Organization (WHO). (2021). "The role of probiotics and fermented foods in gut health." https://www.who.int/
- 4 tips for finding time to exercise
- 5 healthy breakfast ideas
- Athlete's digestive disorders
- How often to exercise to be effective?
- How do you ferment your vegetables?
- How to sync your exercise with your menstrual cycles?
- Lumbar osteoarthritis: walking, swimming… which sports to adopt?
- Our motivation to play sports may be influenced by our intestinal bacteria
- Teens and sport: beware of excess
- Walking 10,000 steps a day is fine. Walking faster is better!
- Post-Sport Electrostimulation: Enhancing Recovery and Performance
- What sport after 40?
- What should you eat to have beautiful muscles?
- What low-iron diet for patients with hemochromatosis?
- What is the reason behind feeling hungry before or during menstruation?